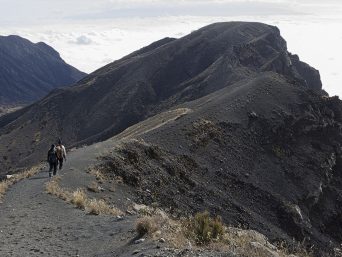
Machame, alongside Marangu route, is one of the most popular routes on the mountain. This route takes a south-southwest approach up the mountain and has a very high success rate due to the path the route takes. On the path you climb high and sleep low, assisting with acclimatization. It is also considered the most scenic route, offering spectacular views of Kilimanjaro. Interesting points on this climb are the Barranco wall and Lava tower. Ascent is done on the Machame route but climbers descend down Mweka. This makes it less crowded and allows for climbers to see more of the mountain. The path is a bit steeper on this route and the days are longer as climbers take the “polepole” slow pace up the mountain to each camp. This route can be done in as little as 6 days but 7 days is recommended.
- Number of days needed: 6 or 7 (recommended)
- Total walking distance: 49km
- Starting elevation: 1,740m
- Price: $-$$
Day 1
After breakfast in town you will head out towards Machame Village and the Machame gate on the slopes of Mt. Kilimanjaro. The drives takes about 35-40 minutes from Moshi. At the gate you will register with the National Parks and the porters will have their bags weighed. After all the paperwork is done, you will head into the rainforest to start your ascent. Winding through the rainforest you will come across black and white Colobus monkeys as well as different birds. The path at this point is dirt and not rock with some wood “steps” along the trail to make it easier if it’s muddy. The first camp, Machame Camp, is located on the outskirts of the rainforest. When you arrive at camp you will sign it at the rangers hut, a process that you complete at each camp you arrive at. The porters will have passed you on the trail and everything at camp will be set up with the chef already preparing dinner!
Machame Gate (1,840m) – Machame Camp (2,980m)
- Distance: 9km
- Trekking time: 6-7 hours
- Altitude gain: 1,140 meters
Day 2
Climbers usually wake up quite early on the mountain as you go to sleep early the night before. After a hot breakfast in the mess tent, you will head out for your next section of the climb. The water will have already been purified for you and if you leave your water bottles out during breakfast, the trekking crew is happy to fill them for you before you start. All you have to do at camp is pack your day pack with anything you want to bring on the hike and also make sure your clothes are packed away. The porters will take apart the tents and clean up the camp before heading up to the next one to get it ready for your arrival. The environment changes on this day as you hike through the transition zone from increasingly sparse forest to a rockier surrounding. When you get to the camp you can hike out to the nearby Shira caves with the guides. When people first started to climb the mountain, the porters and guides did not have tents to sleep in and would often sleep in the caves. The Shira plateau, where the camp is, provides stunning views of both Mt. Meru to the west and of the Kibo peak of Mt. Kilimanjaro.
Machame Hut (2,980m) – Shira Camp (3,840m)
- Distance: 7km
- Trekking time: 5-6 hours
- Altitude gain: 860 meters
Day 3
Again after a hot breakfast, you will head out to start your hike. On this day, you climb high before descending to sleep as sleeping at a lower altitude is better for you. This also gives you a taste of what it is like to be at higher altitudes and we can evaluate any symptoms you may be feeling. Your first part of the hike takes you to the Lava Tower where you will stop for a hot lunch. Some people camp at the Lava tower if they have added extra days to their climb. After lunch you will descend into the Barranco valley where your camp is.
Shira Camp (3,840m) – Lava Tower (4,600m) – Barranco Camp (3,950m)
- Distance: 11 km
- Trekking time: 6-7 hours
- Altitude gain: Ascent 760 meters
- Descend 650 meters
Day 4
Today is a favourite among most climbers on this route and is the day that you face the Barranco wall or “breakfast wall”. It is not a normal hike as you “scale” the wall but don’t be nervous as no special equipment is needed and it is easy to do. You can simply use your hands to steady yourself along the wall. The guides are there to help you along the way as well. You will pass across streams and eventually cross over the Karanga River. After another short climb you will be at the Karanga Valley Camp for the night.
Barranco Camp (3,950m) – Karanga Camp (4,040m)
- Distance: 5.5 km
- Trekking time: 4-5 hours
- Altitude gain: 55 meters
Day 5 (SEE OPTION BELOW)
This day is quite short compared to the others, which is an advantage, as you will be attempting your summit that night! The path gets increasingly steeper as you get closer to the Barafu Camp. You will arrive in time for a hot lunch and have the rest of the day to rest
and relax before the summit push. This camp is interesting as it is on an exposed ridge. It is a good thing to familiarize yourself with the surroundings in time for nightfall so you don’t make any missteps!
Karanga Camp (4,040m) – Barafu Camp (4,680m)
- Distance: 3.5 km
- Trekking time: 4-5 hours
- Altitude gain: 640 meters
DAY 5 IS AN OPTIONAL DAY – CAN BE REMOVED TO MAKE TRIP 6 DAYS
Climbers on previous day would pass Karanga Camp on their way to Barafu Camp as the final destination.
Day 6
This is summit day! Climbers will wake up just before or close to midnight to prepare for the final ascent to the summit, which is done in the dark. “Breakfast” will be already prepared. Depending on how many climbers there are, some of the porters will join you and the guides on the summit attempt to provide extra support if needed. The walking pace is very slow, with climbers focused on putting one foot in front of the other, following the trail of headlamps you see before you. Climbers often feel very sleepy at this time but just keep going forward! The path you take is a switchback but as you keep going up you do start to feel more of the incline. The aim is to reach Stella point, your first checkpoint, at or just after sunrise. At this point climbers can take a bit more of an extended break and enjoy the beautiful views from the top! Uhuru peak, the final summit, is about a 1-2 hour walk away on a more flat path with very little to no incline. Climbers can experience difficulty breathing on this portion even though it is more flat. Elevation is at xx Stella Point compared to xx at Uhuru Peak. After taking pictures at the summit sign, you will descend back down to camp for a short break and some food. The path down from the summit is loose gravel. The guides and porters are more than happy to help you down and often feel that if you let yourself go a bit loose you can usually slide/walk down at a faster pace than if you are nervous and trying to go alone. Walking poles can come in handy for this part. The descent back to the camp takes about 4 hours. After your rest, you will start to descend towards the Mweka camp where you will stay for the night.
- Distance: 20 km
- Trekking time: 12-14 hours
- Altitude gain: Ascent 1,295 meters
- Descend 2,795 meters
Day 7
After breakfast you will head down the final part of the mountain to the Mweka gate to receive your certificate and head back to Moshi for some well-deserved rest and a hot shower!
Mweka Camp (3,100m) descend to Mweka Gate (1,800m)
- Distance: 13 km
- Trekking time: 5-6 hours
- Descend: 1,300 meters


